Catheter use
Description
I used to use a catheter (the
Foley type, not
the Foley brand) due to urine retention issues. I expected the problem to
be solved at some point, so I was never worried. (The whole thing feels a
bit Borg, but without the collective.)
What I did find absolutely shocking though, was the lack of practical
information on the subject. Hospitals just a few kms apart provide different
and often conflicting information on their websites.
The information below is based on practical experience, more or less using
myself as a guinea pig. How many health care providers use a catheter
themselves and have practical experience doing the dishes or going to the
supermarket while wearing a catheter? Not many I suppose.
The purpose of this document is to fill that gap. It is meant to be used in
an open source spirit: Share, improve and publish.
A word of caution
Normally a system of valve-like structures and sphincters (circular muscles)
makes sure that the urinary tract is one-way only; Stuff goes out and not in.
With a catheter this no longer the case. You have to be very careful about
what you hook up to your catheter; Bubbles in drainage hoses move up,
carrying who knows what with them.
The use of catheters may be regulated. And regulations vary a lot!
Replacing the catheter
Catheters need replacing every now and then. It's customary to use a
lubricant while inserting a (new) catheter.
Ask the person removing the catheter the use lube for removal as well. Just
insert lube next to the catheter. It makes removal a lot easier; I had mine
removed with lube without any discomfort at all!
When inserting the new catheter, align the ports in a plane parallel to the front of your body; If you wear the hose on the left leg, the balloon port should be at the right. This way the two ports fit neatly under your trousers. (This corresponds with the balloon port being on the left when the catheter points straight up; By putting a U-bend in the catheter this becomes right.)
Unclogging the catheter
A clogged up catheter can be fixed with a sterile saline solution.
Your care giver may provide you with information on this subject.
I unclogged mine several times.
And sometimes mucus temporarily blocks the catheter; The blockage leads to
a pressure buildup, which in turn pushes the mucus out, thus unclogging the
catheter.
Bags
The catheter connects to a drainage hose. The hose connects to a collection
bag. The whole system is airtight. If it smells (other than a slight plastic
smell), there is something wrong.
It's best to use bags with a non-return or anti re-flux valves. This way,
urine can't flow back from the bag into the hose. This makes things a lot
safer. In some cases the use of these valves is mandatory.
Some bags are sterile. Others are not. In some cases the use of sterile
bags is mandatory. New bags should always be clean!
Some bags need to be replaced every day. Others last a week.
Day bag
The most convenient is a small bag strapped to the lower leg, with the top
strap just below your knee. (Don't use upper leg bags. They are highly
impractical.)
To empty it, just put your foot on the rim of the toilet bowl and open the
valve. Aim for the deeper part of the bowl or a (nearly) vertical surface,
otherwise droplets may end up on your shoe!
After closing the valve, clean the lower end of the valve with a tissue or
some toilet paper. This avoids urine dripping onto your sock. Some recommend
cleaning the valve with 70% alcohol (isopropanol).
You don't need baggy jeans for a urine bag. Regular (straight) jeans provide
enough space, provided you empty your bag regularly. Skinny jeans probably
don't work.
Don't use a bag that is very high; With a 'tall' bag the valve will lean on
your sock. Some valves come with a little hose meant to couple to a night
bag. If it leans on your sock, just remove it. Removing it also makes the
valve easier to clean.
Some bags are covered with fabric. It's supposed to make the bag more
comfortable. Make sure you're not allergic to the fabric used.
Some people are a bit embarrassed by this whole catheter thing. Wearing a
day bag as described on this page makes the whole thing completely
invisible!
Straps
The day-bag is attached to a pair of straps (by means of buttons). Each strap
has a hook-and-loop fastener / Velcro-like material or buttons at one end.
I change bags while sitting on the edge of a chair or bed. When I put on a
new one, I first attach it loosely on my upper leg, slide it down and then
tighten the straps. This way the straps don't move all over the place.
To avoid an entangled mess, store the straps with the 'velcro' bit on the
outside. And bags with the 'velcro' bit on one side and the rest of strap
on the other.
Night bag
This is hooked to a little frame next to your bed or to a hook on your bed
or chair. Note that not all hooks fit your bed. A bed hook may need to be
modified to actually work!
Some people connect the night-bag to the day-bag valve. Others remove the
day-bag and connect the night-bag directly to the catheter. The latter is
probably more convenient; Having a hose connected to your ankle can be very
impractical.
And don't mix the two methods: if you change from the night-bag connected to
the day-bag to the night-bag connected directly to the catheter, it's
probably a good idea to replace the night-bag at the same time.
Universal night bag hook
I modified my hook to fit on: The bed, a central heating radiator, my desk's
drawer and when the bag is (almost) empty, the elastic band on top of my
underwear. The latter is really handy when you need to do something which
requires both hands. This hook also makes it very easy to carry the bag in
your hand.
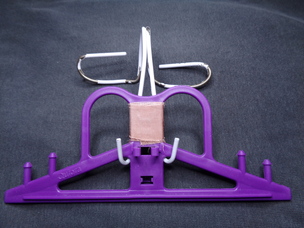
The purple bit used to have a little arm on the back, which is supposed to
fit on your bed. Of course, this doesn't work. So I removed it.
The thin white steel rods used to be central heating radiator humidifier
hooks. I used water pump- / tongue-and-groove pliers to bend them into
shape. Wide brown tape fixes them to the plastic frame.
It may not look pretty, but it does work.
Below the hook with a two litre night bag on a central heating radiator
and on a bed. The hose is taped to the hook:
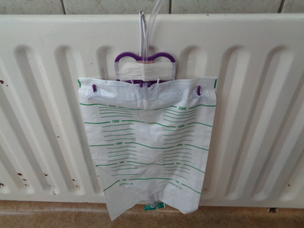
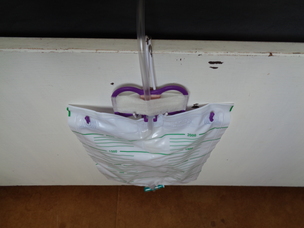
It is very handy to be able to put this thing just about anywhere.
Modify to suit your needs.
Valves
As far as I know, these come in the following types:
- Cross
- Lever
- Pull
- Turn
I prefer the cross type.
Bag maintenance
Opinions vary a lot: rinse the bag with water and vinegar, water and soap, with just plain water or don't rinse the bag at all.
If I understand my bag's manual correctly, one should only rinse the
night-bag and not the day-bag. And only if it's connected to the day-bag.
If the night-bag is connected directly to the catheter, it should not be
rinsed either.
Drainage hoses
Hose types
Some people seem to think that a thicker hose is better. However, the
opposite is true;
A thick hose has a larger surface area and therefore more area that debris
can stick to.
A thin hose has a faster flow, so any debris will be washed down into the
bag more efficiently, effectively cleaning the hose. And don't think a thin
hose will get clogged up. Anything that can flow though the catheter, will
most definitely flow through the hose.
A flexible hose is more convenient than a rigid one. A rigid hose may also
mess with your catheter. The difference is even bigger with a night bag. In
some cases a rigid night hose may lead to sleepless nights. Always use a
flexible hose for a night bag!
I move about a lot when I'm asleep; I woke up once with my blankets turned
90°. A night hose should accommodate this. When I pull on the hose my bed
hook will even slide on the side of my bed towards me without falling off.
Not all bed hooks are capable of doing this!
There are several ways of making a hose flexible:
- Small diameter.
- Use rubber instead of PVC or polyethylene.
-
Corrugated anti-kinking:

A very nice hose. Urine gets 'stuck' on the corrugated bits though.
Hoses may be regulated. And care organisations and hospitals may have their own internal guidelines. This should not get in the way of finding a hose that suits you though! Some of these so called guidelines are dead wrong.
Hose length
Some hoses need to be cut to length. Cutting hoses to length works quite well with scissors. Make sure your hands and all the tools you use are clean before cutting hoses. If you use the same scissors to cut tape, remove the tapes' adhesive from the scissors before using the scissors to cut a hose.
Hose path / routing
Pictures of catheters in use make no sense whatsoever!
I ride a bicycle and the catheter moving about actually causes
injury!
A tip from a nurse working for my GP: To avoid this, the catheter should
go up to your lower abdomen and then make a U-turn down towards your
leg! This means the first part of the catheter goes up, not down!
(Inside the body the last bit of the urethra goes up as well, so up is
nature's way.) The U-turn itself should be on your belly, just above your
leg (the boundary between the two is clearly visible when you sit down). The
coupling with the hose goes on your leg.
The U-turn must be taped to your belly (trim your pubes a bit first). Of
course, the catheter needs to be long enough to make this work! Do
NOT put the tape directly on the catheter. Put some tissue in
between;
Avoid the tape's adhesive (glue) coming in contact with the catheter.
Otherwise bits of adhesive may end up inside you!
Try to use underwear as a way to reduce motion (not shorts) and apply some
(K-Y) lubricant where the catheter enters your body.
You may need to experiment a bit, to optimise for maximum comfort.
Avoiding bumpy roads also helps. A Citroën like shock absorption system in
the bike seat will probably also contribute to comfort. And reduce cycling
to an absolute minimum. If you overdo it you still may get hurt. Injuries
inside your urethra may become infected. These infections can be very
painful indeed and may require the use of powerful pain killers that turn
you into a 'zombie'.
Day hose
The bag should have the lower part of the hose halfway between the front and
the outside of your leg. This way, the hose bends nicely next to your knee.
(A lot of pictures show the hose on the inside leg. However, a hose on the
outside of the leg has less- and wider turns.)
This puts the catheter - hose coupling underneath your trouser pocket: When
in doubt, just put your hand in or on your pocket to check the
connection.
The hose in between crosses the front of your upper leg diagonally. Apply
the tape while standing with your legs spread out a little and put the tape
halfway your knee and the coupling.
Night hose
For maximum comfort, it's best to fix the hose while in bed. Use tape
that doesn't need to cut but can be torn. Apply a temporary fix before
going to bed and replace this while in bed:
Stretch your leg and put the coupling high / close to your belly.
Otherwise it might disconnect. Tape the upper part of the hose halfway
between the inside and the front of your leg. Tape the lower part to the
front of your leg about 10 cm above your knee.
If you do this properly, the hose won't disconnect when rolling from side
to side. However, if you roll all the way to belly down the hose may
become undone. So it's probably a good idea to tape a trash bag to your
mattress.
Removing tape adhesive
A tissue with acetone followed by one with an alcohol-water mixture works rather
well.
Note: Acetone is not necessarily the same thing as nail polish remover.
Note: There are straps that can be used instead of tape to fix the hoses
in place.
Warning: Some plastics dissolve in acetone! When I clean my scissors I
make sure the acetone only touches the metal bits.
Switching hoses
In the morning one might not be fully awake yet
and in the evening very tired, so it's a good idea to keep everything as
simple as possible.
An empty bag is easier to handle than a full one. So empty the bag in use
before changing it.
The bag manufacturer may provide a user manual. Unfortunately, manuals
usually come with boxes of bags; not with individual bags.
Prepare everything first: tapes cut to length, bags in the right place,
etc.
When switching night- and day-bag connectors, I have the day-bag strapped to
my leg and the night-bag hooked up to a desk drawer or bed. This way I can
switch hoses within a few seconds.
Disconnect hose
Remove the old tape (and then the tape's adhesive).
Put a tissue (or something bigger) under the coupling
and keep in mind that there may be bits of urine on couplings, connectors
and caps. Use tissues to deal with this as well.
After disconnecting a hose pull it up. This will move most of the urine from
the hose to the bag. Next, move the connector in a horizontal position above
a tissue. And then put a cap on the connector. Caps are not always
completely waterproof, so it's a good idea to wrap a tissue around the
cap.
Connect hose
Make sure the hose follows a nice path without weird twists and turns.
Put the connector in a horizontal position above a tissue. Remove the cap
and put it on an other tissue. Next insert the connector into the
catheter.
I dry the connector with a tissue if it's wet. Some recommend cleaning the
connectors with 70% alcohol (isopropanol) before making the connection.
Urine flow
I found that if I sit still during hose switching, no or very little urine
flows out of the catheter. However, movement (such as leaning forward) may
release a dozen ml or more! And if you are very unlucky, mucus is released
during the switch leading to a bit of a surge.
Some people recommend using a towel instead of a tissue underneath the
coupling during hose switching. If you have a convenient receptacle, even
better.
Storing and cleaning caps
Hold the cap above a tissue with the open end down. Then tap it on the
tissue. This will remove most of the urine that might be in the cap.
For a more thorough cleaning, rinse the cap with tap water and then with
ethanol. Make sure all of the ethanol evaporates completely before reusing
the cap. You don't want alcohol vapours in your bladder;
When fully dry the cap might smell ever so slightly of plastic. It should not
have any other smell at all.
If caps have similar sizes you can put one on top of an other.
A cap also fits on an old saline solution connector; Cut off the bag and use
the clamp / valve on the hose to close it:
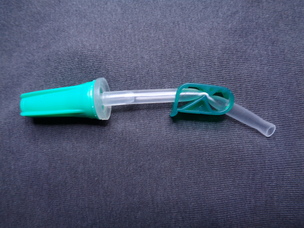
You can clean it the same way as a cap.
I suppose you can also put caps in a box or a bag.
Underwear
My fashion sense is very simple: If my body is happy with the clothes I
wear, I'm wearing the right clothes.
Some claim that you need to wear loose underwear in order not to restrict
the flow. This however, has no basis in fact; Even if you lay in bed on
top of the hose, there is still is sufficient flow. Very tight underwear
is more likely to restrict the blood flow in your body than it is to reduce
the urine flow in your hose.
The most convenient catheter compatible underwear has a shape resembling
the swim briefs that divers wear: It fixes everything neatly in place and
the catheter coupling is easily accessible. It may not be fashionable, but
it saves you a lot of trouble.
Showering
Some use a plug instead of a urine bag during taking a shower. And some a
night-bag.
With a plug, urine builds up in the bladder. You need to dispose of this
later.
With a night bag, you need to suspend it somewhere. This restricts your
movement and risks disconnecting the hose.
Until a got a plug, I used to use a day-bag: I washed the bag and my leg
underneath the bag. This of course means that the straps get wet.
Note: Some leg bags are covered with some sort of fabric. It may not be
a good idea to shower with those. See:
Non woven day bag cover.
Note: If the hose gets disconnected during showering, it's probably a good
idea to replace the bag.
After the shower I first replace the U-turn tape and tissue. Next I replace
the straps one by one. First the top and then the bottom strap;
I dry the bag and my skin underneath the bag with a tissue. Next I remove
the strap and dry the skin where the strap was and the inside of the button
holes in the bag (some bags have loops instead) with a tissue. I then apply
a dry strap.
Non woven day bag cover
Some day-bags are covered with a material described as 'nonwoven'.
The properties of these vary a lot!
To test for shower compatibility, run water over the bag for a minute or so,
dry the bag and then wait to see how long it takes to become really dry.
If it dries really fast, it's probably OK to shower with this type of bag.
Cleaning the straps
You could just (hand) wash the straps, but when wet after showering it's
best to dry them quickly.
I just submerge them in lukewarm water. Stretch the strap bit by bit.
Then rinse in water flowing from a tap. Do all of this twice. Next leave
them to dry.
For really fast drying, submerge the rinsed straps in 96% (or more)
ethanol and stretch bit by bit (the process replaces most of the water by
alcohol) and then leave them to dry. The downside of this is that alcohol
makes rubber hard and brittle. So this method may limit the lifetime of
your straps. Make sure you have a spare pair of straps!
When fully dry the straps should have a slightly rubber like smell and smell
of nothing else.
If they smell kind of sour they didn't dry fast enough. When this happens
you can clean them with a
hydrogen peroxide
- (cleaning / white) vinegar mixture, followed by the above procedure.
Note that highly acidic vinegar may damage rubber!
For a more conventional hand wash, hypo allergenic shampoo works really
well. So you don't have to buy a hand wash laundry detergent just for your
straps.
Tip: Hand wash laundry detergent leaves your garments with a soapy smell.
Hypo allergenic shampoo does not.
Misc
Alcohol drying
Alcohol drying can mean two different things:
- Reduce the amount of water in an alcohol - water mixture.
- Use alcohol to dry something really quickly.
If you add alcohol to a moist fabric and wring it out, most of the water will
be replaced by alcohol. And alcohol evaporates much faster than water.
This is what I do to dry something small really fast.
For disinfecting 70% alcohol is used.
For alcohol drying, 96% or more.
Don't get the two mixed up.
Disinfecting
Some people are allergic to some disinfectants, including disinfecting soap.
An alcohol based disinfectant is usually OK.
See:
There are pre-packaged pads / tissues / wipes containing ca 70% alcohol. A rayon - polyester mix seems to be quite common. If you want to use it on (your) skin, it might be a good idea to buy a 100% cotton version instead.
Soap
The hand soap, shampoo, shower gel, laundry detergent and washing up liquid
I use are all hypo allergenic; They don't contain colourant or perfume.
Perfume can be an irritant. Some people are even allergic to it.
Perfume also masks smells. And sometimes you need your nose to smell what is
going on.
Note: A product containing perfume is never hypo allergenic, regardless
of what a manufacturer might claim!
Solvents
Make sure none of these get into your catheter or hoses.
Acetone
I use 100% pure acetone, not nail polish remover.
Ethanol
There are several types of alcohol.
Ethanol is the type
found in alcoholic beverages such as whisky and beer. Ethanol usually has an
added denaturant (see:
Denaturation
(food)). Make sure the denaturant doesn't leave any residue!
Methanol and MEK /
butanone evaporate.
Bitrex /
denatonium does not.
Euro denaturant contains bitrex.
Isopropanol
Some denaturants damage some plastics.
This is when isopropanol, also known as
isopropyl alcohol
is handy.
It has a bit of a pungent odour and a slightly anaesthetic effect though.
Cheap mixes
Supermarkets sell cheap
denatured alcohol
like products. Sometimes that's all you need.
Note: Keep in minds that some of these products might leave a residue that
doesn't evaporate. So you can't use it for everything!
Tape
Brown tape sticks better than white tape, but needs scissors to cut.
Note that a product that is advertised as hypo allergenic has not been
tested on all 8.3 billion people on the planet. Some people are allergic
to some 'hypo allergenic' products; I'm allergic to some white tapes
(not all).
You may need to experiment a bit to find a tape that suits you best.
Tissues
The toilet paper I use is white. So are paper towels / kitchen rolls;
A lot of dyes / printing inks dissolve in alcohol. Some don't dissolve in
alcohol but do in acetone. And you don't want cleaning things to cause
stains!
Some paper falls apart when wet. Some can cope with water but not with
alcohol.
Sheets of toilet paper can be thought of as very small tissues. Sometimes
that's all you need. A paper towel cut in two also makes nice small
tissues.
You may need to experiment a bit to find the right product.
Catheter sizes
Width
See: French catheter scale.
Length
It's the nature of the beast. Members tend to change size all the time (this
is why you shouldn't have adhesive on your catheter) and I don't think
catheters are designed with this in mind. They are a bit too short. One may
actually end up with a bit of a tug of war between oneself and the catheter's
balloon: One can actually feel the pressure caused by the balloon inside the
bladder!
If you temporarily want a bit more space, remove the tape from the U-turn
and cover the catheter with lube all the way up to the Y-bit where
the urine drainage- and balloon port split off.
However, all of this is a bit of a hack and manufacturers really should make
longer catheters.
Before being fitted with a catheter, always ask for the longest catheter
they have got! If it's too short have it replaced (by someone else /
at an other health care facility).
A short catheter can be rather painful. It also interferes with keeping
things clean and keeping things in a fixed position. The latter is essential
if you want to walk or cycle.
Pads
After using a catheter a very long time, your bladder may have lost it's
way a bit. This may lead to urge incontinence;
You wake up in the middle of the night, walk to the toilet and start
before you are there.
It's possible to train your bladder before removal of the catheter. This
can be done by means of a valve between the catheter and the drainage
hose. By closing it every now and then your bladder gets used to holding
larger amounts of urine. However, I recommend using incontinence pads
immediately after catheter removal anyway.
Pads are really high-tech and work very well. They combine a small size
with the ability to absorb large amounts of liquid. They are also very
comfortable to wear;
The outside is waterproof and is covered with adhesive strips that stick to
your underwear. The inside is a capillary layer that sucks your skin
bone dry in one to two minutes, so you don't feel wet. In between is a layer
that stores liquid many times it's own size and weight.
Keep in mind that pads only work with underwear that keeps your gear
firmly fixed in position. Again, don't wear shorts! You don't need
stretch, 100% cotton is fine. And it doesn't have to be tight either. Just
a good fit will do.
Your bladder will gradually adept and become it's former self, so this is
only a temporary thing.